HOME     PROJECTS     STORIES     PHOTO WIZARD     ABOUT     WEBSITE

Tuesday, November 30, 2010

Meet us Ft. Union!

There's a party going on this Saturday and YOU are invited! We'll be at the Ft. Union Deseret Book store sharing how easy it is to make these block ornaments.

You really should stop by and check it out!


We bring the supplies and you leave with a finished ornament. All you need is about 15 minutes and $1.00 (to cover supplies!)

Not only do you go home with a beautiful ornament, but you leave with the knowledge that these little beauties are SUPER EASY to make. Before you know it, you'll be cranking them out for everyone on your 'Nice' list!


Contact the store for more details (You can also just stop by between 10:30 and noon!)

Wednesday, November 24, 2010

Black Friday Sale, 30% off... EVERYTHING!


We're getting on the Black Friday Sale bandwagon! Starting tonight, we will offer 30% off everything in stock. The best part is that you don't have to get up at the crack of dawn or endure freezing temperatures to take advantage of the savings.

Stop by while the bird is baking. Stop by after the company has left. Just be sure to stop by our web store and place your order by Sunday, November 28th.
Use code: THANKS2010 at checkout.

Our Memory Puzzle Kits are on back order AGAIN! How is that possible? We just replenished inventory 4 weeks ago and here we are scraping the bottom of the barrel. Another order is in the works and we hope to have a delivery date early next week. If you want a puzzle kit at the discounted rate, go ahead and place your order online. We'll follow up with the expected due date. If that date doesn't work, we'll provide a full refund.

Monday, November 15, 2010

A Sweet Deal

Just noticed that Overstock.com is running a big sale. We think this is quite meaningful given the fact that several of our projects are available there.

Even better, right now shipping is just $1.00.
Does it get any sweeter?

Sunday, November 14, 2010

A Season of Thankfulness

It's mid-November! Where has the time gone? My sweet baby is two-months-old and growing way too fast. In my spare time (ha!) I gathered a few supplies and made this banner. All I needed was some burlap, twine, paint and a sewing machine. Oh, and a sleeping baby so I could put it together!!

It hangs in my kitchen where we can all see it everyday. It's a great reminder that we have much to be thankful for. And with this new season, I am trying to help my kids say THANKS for all that they have.

I used butcher paper to create a simple stencil of each letter. A quick dab of black paint with a stencil brush added the lettering to each triangle of burlap. The fabric pieces are connected with the twine, sewn in place using a zigzag stitch. The dot garland was even easier! I cut out dozens of different colored circles using a 1" and 1.5" circle punch. All that was left was stringing them together using a straight stitch on my sewing machine.

Of course, Lauri had to have one also! She made her own dot garland, with a slight twist.

Wishing you a Thankful November!

Friday, November 12, 2010

Why Does it Do That?

If you have tried to format your pictures using our Photo Wizard, you might have noticed a slight variation between what you see on your screen and the final print that our Photo Wizard sends you.

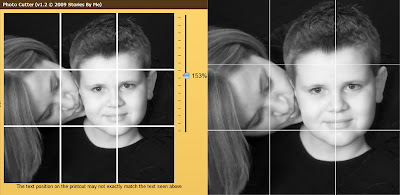
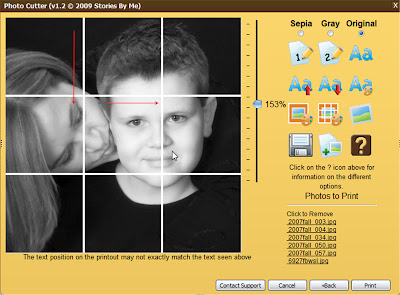
Here's the screen version. Formatting pictures for the puzzle can be tricky because you are trying to keep the 4 lines (nine sections) from dissecting important parts of the picture. I scaled the picture to 153% to fill the frame to my liking. The position of the faces look OK too. Notice how the right line falls to the left of the boy's eye and near the bottom of his chin?

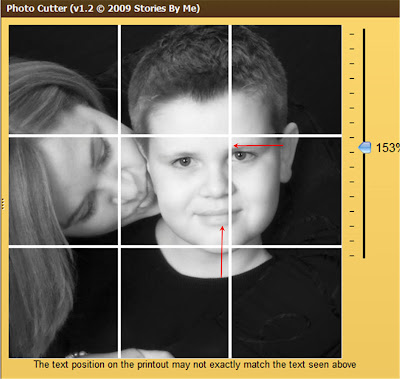
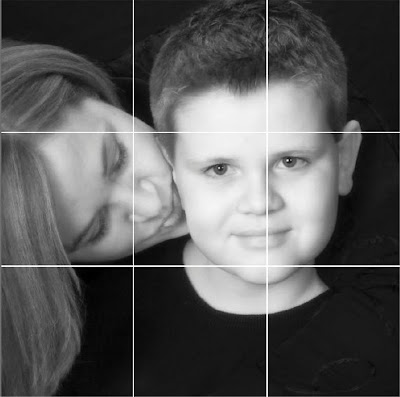
The above image shows the picture as it comes back from the Photo Wizard. WHAT? The line now runs down the center of the boy's nose and near the bottom of his lip. That's no big deal, but one of the other lines (the line that you CUT!) now runs through the mom's eye. That is a much bigger deal (partially because it's MY EYE!) Seriously, we've helped more than a thousand of you create these works of art. It's no big deal to cut through an ear, forehead or cheek, but cutting through someone's eye is somewhat disturbing as it distorts the entire face.

Our programmer tells us that this is due to the fact that we are viewing the image on our screen, but the software formatting the picture actually resides on a server several states away. Because of the myriad of computer monitors, not to mention all the varieties of possible settings, our software has to make some assumptions as to what you are seeing.

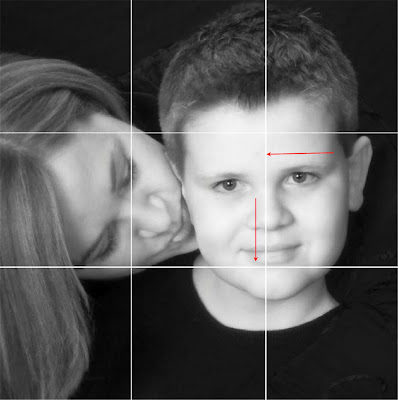
Knowing that the Photo Wizard sees things slightly to the left and down from what I'm seeing, I simple pushed the picture up a little and to the right of where I wanted the final line to reside.
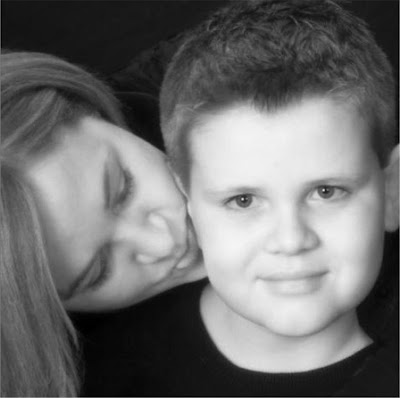
I now have the perfect layout for the puzzle project. This cute picture was from a family photo shoot a couple of years ago. I'm actually whispering into the ear of my son during the session, telling him to knock off whatever shenanigan he was up to. The photographer captured the moment and it's ONE of my favorite pictures!

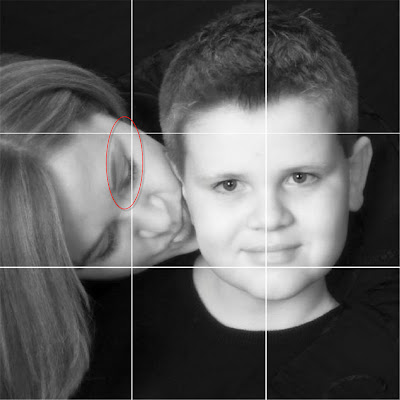
Other projects are much easier to layout. Here's the ornament project...

Notice that a smidgen of the ear is missing. Not a big deal as I know that I'll be sanding that edge and distressing it with ink as I finish the ornament. If I wanted to, I could apply the same process of pushing the picture slightly to the right to get the entire ear in the window.

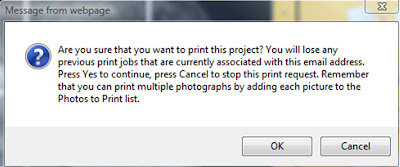
Keep in mind that you can only have ONE active print job in your account at a time. If you decide to reformat your pictures and repress the Print button, you'll get the following message:

If you think you MIGHT want to use that previous layout, save a copy of the file to YOUR COMPUTER. (Saving a copy of the email doesn't help, it only provides the link to your file!)

Now you know!

Thursday, November 11, 2010

It's Begining to Look a Lot Like Chrstimas!

Christmas gift #1 is finished, wrapped and delivered! That's a big deal for this small team of hopeless dreamers. (We have some BIG plans around here...just never enough time to pull it all together!)

At one of our recent classes we met a darling attendee that just went wild over the different projects. She had seen some of our kits in the local stores, but didn't understand their full potential until we displayed our finished pieces at the class. She went crazy and bought items for ALL of her family, not to mention several work friends. She happens to work for a pretty important government official in our state and together, we decided to present him with a memory of Utah's history.


Check it it... it's completely done and ready for Christmas (AND it's still early November!!) Now if I could only get my act together on the rest of my holiday plans...

Monday, November 1, 2010

Creative Halloween Treat

Some people would say that Halloween was a bust this year. Just as the prime time for Trick-or-Treating rolled around, big dark rain clouds blew in and we were deluged in a downpour. I think we saw a total of 8 trick-or-treaters, and that's for the entire evening!

Our very cute, and talented neighbor was one of those brave souls willing to dodge rain drops to bring us a treat.{Does it get any sweeter? We stay warm and dry...AND we got the treat!}

Check out what she made...


Yup, they're marshmallows, covered with mint chocolate and then dipped in milk chocolate. They really are too cute to eat, but my 13-year-old couldn't resist and snuck the first one while we were still visiting with our neighbor.

I know that Halloween is now a year away, but this creative idea could easily be converted to snowmen. Knowing my neighbor Erica, she's already thought of that!